

1/8"–1/2" Overlap: Wallpaper Inside Corners Without Slant
The best method for wallpapering an inside corner is to split the incoming strip, wrap a small overlap by a few millimeters onto the next wall, then hang the following strip plumb so its edge covers that overlap. This works because inside corners and walls are almost never perfectly straight, and wrapping a full width around one causes tracking, wrinkles, and patterns that slant off course. Material matters too: vinyl, peel-and-stick, and traditional paste each call for small adjustments, covered below.
TL;DR:
- Using a split strip and small overlap ensures pattern alignment while accommodating irregularities and preventing slanting or wrinkles.
- Accurate measurement involves checking the wall-to-corner gap at multiple points, then adding an extra eighth to half inch for proper wrapping.
- A plumb line drawn a few inches from the corner provides a reliable reference, avoiding distortion caused by trusting uneven or settled corners.
- Vinyl, peel-and-stick, and textured wallpaper each require different overlapping and sealing techniques to ensure durability and a clean finish.
- Dull blades, improper wall prep, and skipping primer are common mistakes that can lead to ragged cuts, misaligned patterns, and poor adhesion.
Table of Contents
- What Tools and Prep Work Do You Need Before Wallpapering Inside Corners?
- How Do You Wallpaper an Inside Corner Step by Step?
- How Do You Trim and Finish Wallpaper Corners Cleanly?
- Does the Wallpaper Type Change How You Handle Corners?
- Quick Fixes for Common Inside Corner Problems
- Where to Find More Installation Guidance and Product Options
- Why Should You Draw a Plumb Line Instead of Trusting the Corner?
- When Should You DIY an Inside Corner vs. Hire a Pro?
- Simplify Your Next Corner Install With the Right Wallpaper
- Sources
- FAQ
What Tools and Prep Work Do You Need Before Wallpapering Inside Corners?
Corner work exposes every shortcut. Before you cut a single strip, gather what you need and get the wall ready.
- A laser or spirit level (a laser saves time on tall walls)
- A snap-blade utility knife with a full pack of spare blades
- A wide putty or taping knife (6 inches works well as a cutting guide)
- A seam roller and a smoothing brush
- Border or seam adhesive for paper-on-paper joins
- A paste tray, pencil, tape measure, and a stable ladder
Clean the wall first to remove dust and grease, then sand down any ridges or old paste residue. Fill dents or nail holes and let the filler cure fully. A coat of quality wallpaper primer follows. Professional installers point to primer as the step that creates a uniform surface for adhesive to grip, and it also makes the paper easier to remove later, according to Design Coterie. If you’re working with removable material, check whether your surface needs a primer before peel-and-stick wallpaper goes up, since some walls hold adhesive fine without one.
Swap blades often while cutting, wear a dust mask when sanding old paper, and lay down a drop cloth. Wet paste and drywall dust do not belong on hardwood.
Pro Tip: Keep a small dish of clean water and a rag nearby while you work the corner. Paste that dries on the surface is far harder to remove than paste wiped away wet.
How Do You Wallpaper an Inside Corner Step by Step?
Getting the corner right comes down to measuring carefully and never trusting the corner itself to be straight.
- Measure the gap three times. Check the distance from the edge of your last full strip to the corner at the top, the middle, and near the baseboard. Walls shift more than people expect, so use the widest of the three measurements to size your cut, a method recommended by Brewers Decorator Centres.
- Cut with extra width. Add roughly 1/8" to 1/2" to that widest measurement so the strip can wrap slightly around the corner. Use the smaller allowance on a wall that’s close to true and the larger allowance where the corner looks visibly out of square.
- Paste and hang the split strip. Position it so the narrow wrapped edge turns just barely onto the next wall. Only a sliver needs to disappear around the corner, following the guidance from The Wallpaper Lady on avoiding a full-width wrap.
- Draw a new plumb line on the next wall. Don’t measure from the corner. Use a level or laser to mark a true vertical line a few inches out from the corner, then dot reference points down the wall.
- Hang the next strip to that plumb line. Let its edge overlap and hide the narrow wrapped edge underneath. Smooth it flat with your brush and roll the seam once the paste sets slightly.
If you’re saving the trimmed offcut, check its width before tossing it. A large enough piece can sometimes fill a gap elsewhere in the room, cutting down on waste, per Graham & Brown’s installation guidance.
A few things worth double-checking before you commit paste to wall:
- Confirm the pattern lines up across the overlap before the paste sets.
- Buy a little extra paper ahead of time. Trade sources consistently recommend ordering more than the exact square footage so a bad corner cut doesn’t force a mid-project reorder in a different dye lot. This insight is echoed by The Wallpaper Lady.
- Where paper overlaps paper, run a bead of seam or border adhesive under the edge for a join that won’t lift later.
How Do You Trim and Finish Wallpaper Corners Cleanly?
A crisp corner depends more on your blade than your confidence. Hold your wide putty knife flush against the wall as a backing guide, pressing it right into the corner crease, then run your snap blade along its edge in short, controlled strokes. Cutting freehand without a backing knife is how you end up gouging drywall or leaving a ragged line.
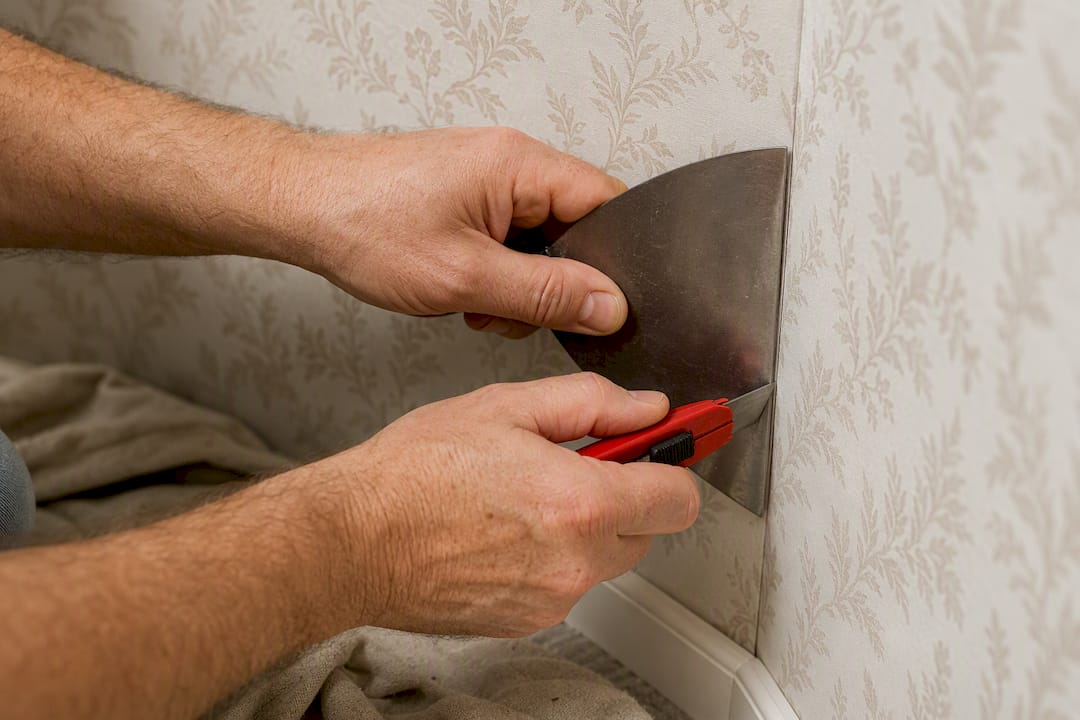
Change blades more often than feels necessary. A dull blade drags through wet paper instead of slicing it, tearing the very edge you’re trying to keep sharp, a point Graham & Brown calls out as one of the most overlooked steps in home installs.
Once the strip is trimmed and positioned, run the seam roller firmly over the join and wipe away any paste that squeezes out before it dries. For paper-on-paper overlaps, apply border adhesive underneath first for a bond that holds through humidity swings.
- Roll seams with light, even pressure rather than heavy grinding strokes.
- Wipe excess paste immediately with a damp (not wet) sponge.
- If a wrinkle appears near the overlap, peel it back gently while the paste is still workable and re-lay it rather than cutting a patch.
- Recheck your plumb line before starting the next strip; one bad corner shouldn’t throw off the whole wall.
Pro Tip: If a wrinkle won’t lay flat even after repositioning, it’s often faster to pull that one strip and rehang it than to fight it for twenty minutes. Wet paste forgives a redo far more than a permanent crease forgives being ignored.
Does the Wallpaper Type Change How You Handle Corners?
Vinyl, peel-and-stick, and traditional paste each behave differently at a seam, and treating them identically is where a lot of DIY corners go wrong.
- Vinyl: Skip overlapping where you can. Vinyl is thicker and doesn’t always bond well to itself, which leads to curling edges over time. Where an overlap is unavoidable, use a dedicated vinyl seam adhesive rather than standard paste.
- Peel-and-stick: The wall surface needs to be completely clean and fully dry before you start. Keep the overlap minimal, since repositionable adhesive can stretch under pressure. Press firmly along the seam, and if an edge won’t sit flat, warming it slightly with a hair dryer before pressing helps it re-seat.
- Textured or flocked paper: Allow a slightly wider overlap and trim with a gentler hand, since aggressive cutting can crush the texture. Some manufacturers recommend a double-cut method instead of overlap for these materials, so check the product instructions first.
- Choose split-and-overlap for most patterned and solid papers, and reserve double-cutting for busy repeats or textured stock where a visible seam would stand out.
Quick Fixes for Common Inside Corner Problems
- Pattern slanting or tracking: Recheck your plumb line and nudge the strip while the paste is still wet.
- Curling seam: Lift gently, apply seam or border adhesive underneath, and roll again. Warm peel-and-stick edges first.
- Visible gap at the cut: Slide a thin matching offcut behind the seam, or run a fine bead of adhesive and press flat.
- Doubled-up bulk at the overlap: Small bulk usually flattens with border adhesive and firm pressure. If it’s severe, pull the strip and rehang it.
Where to Find More Installation Guidance and Product Options
Beyond the steps above, detailed installation resources are available covering primer use, peel-and-stick prep, and common mistakes worth avoiding before you start a room. Custom sizing on murals and wallpaper panels also reduces the number of seams a corner install requires in the first place, since fewer strips mean fewer chances for a slanted match. Ordering a bit of extra paper for pattern matching around corners remains standard practice among installers, so factor that into your initial order rather than reordering mid-project.
Why Should You Draw a Plumb Line Instead of Trusting the Corner?
Every corner in a home looks straight until you put a level on it. Framing settles, drywall mud gets applied unevenly, and corners that look square to the eye are frequently off by a quarter inch or more over an 8-foot wall. If you hang wallpaper trusting that corner as your reference, that small lean compounds with every strip that follows.
A vertical guide line solves this by giving you a fixed, mathematically true starting point that has nothing to do with the room’s actual construction. Mark it with a laser level for speed, or a spirit level and pencil if you’re working alone without a tripod. Place it a few inches out from the corner on the new wall, not on the corner itself, and make several reference dots down its length rather than one mark at eye level.
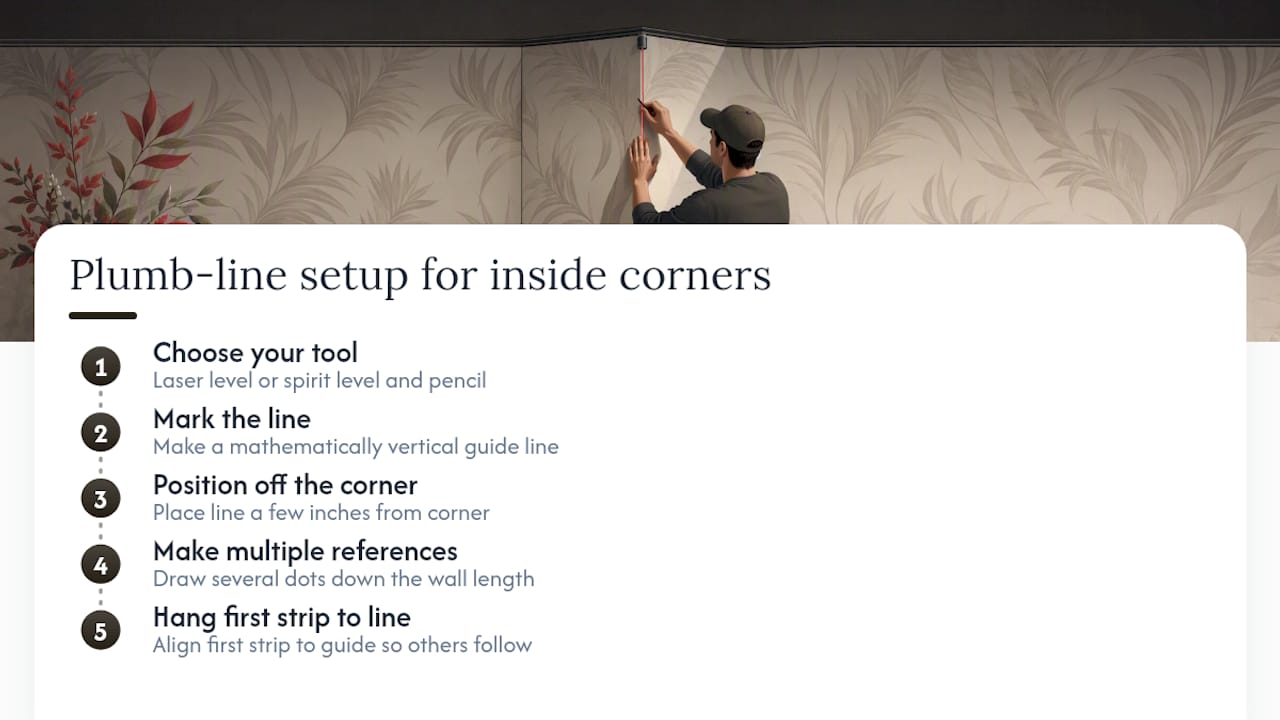
Which? notes that interior corners are rarely perfectly plumb, and that trusting the corner as a guide is one of the most common reasons a wallpaper pattern visibly slants as it travels around a room. Once your first strip on the new wall hangs true to that line, every subsequent strip follows it, and the drift that would otherwise creep in strip by strip simply doesn’t happen. Skipping this step is the single most common reason a otherwise careful DIY install ends up looking crooked by the third or fourth strip past the corner.
When Should You DIY an Inside Corner vs. Hire a Pro?
Corners that are severely out of plumb, curved architectural details, or expensive wallpaper with a large pattern repeat are worth handing to a professional. Most standard inside corners, though, are well within reach for a patient DIYer who follows the measuring and plumb-line steps closely.
— WallsNeedLove
Simplify Your Next Corner Install With the Right Wallpaper
Custom sizing is one of the simplest ways to cut down on corner headaches before you even pick up a blade, since a panel made for your exact wall dimensions needs fewer seams to begin with. Wallsneedlove offers both peel-and-stick removable wallpaper and traditional paste options, so you can pick the format that matches your comfort level with adhesive and repositioning.

Custom murals sized to your specific wall are available through the custom wall mural service, which reduces the seam count around corners on larger or oddly shaped walls. Browse the full wallpaper collection to compare patterns and repeats before you order, and keep the corner math above in mind when you calculate quantity: add a bit extra to your order for trimming and pattern matching so a tight corner never forces you to reorder mid-project.
Sources
- Which? — How to hang wallpaper
- Turning an Inside Corner With Wallpaper — The Wallpaper Lady
- How To Hang Wallpaper Around Corners — Brewers Decorator Centres
- Roman Decorating Products — How to hang wallpaper in a corner
- Graham & Brown support — How to hang wallpaper
FAQ
Should You Wallpaper Around Corners?
Yes, but never wrap a full-width strip around one. Split the strip so only a small overlap turns the corner, then hang the next piece plumb to cover that edge, which keeps the pattern from slanting.
How Do You End Wallpaper in a Corner?
End the strip with a narrow overlap of about 1/16" to 1/2" wrapping onto the next wall, sized to how uneven that particular corner is. The following strip then hangs from a fresh plumb line and covers that overlap completely.
How Do You Put Wallpaper Up in a Corner?
Measure the gap to the corner at the top, middle, and bottom, then cut your strip to the widest of those three measurements plus a small overlap allowance. Hang that strip, wrap the narrow overlap around the corner, then start the next wall from a new plumb line rather than the corner edge.
How Do You Wallpaper Curved Corners?
Curved or rounded corners need smaller, more frequent relief cuts along the curve so the paper can bend without wrinkling. These are trickier than standard right-angle corners, and a severely curved wall is a reasonable case for calling in a professional installer instead of tackling it solo.


Leave a comment