Wallpaper Accent Wall Placement Guide for DIYers
A wallpaper accent wall is defined as a single feature wall treated with decorative wallpaper to create a visual focal point within a room. This wallpaper accent wall placement guide covers every stage of the process: choosing the right wall, preparing the surface, applying wallpaper with precision, and fixing common problems before they become permanent. The industry term for this technique is “feature wall,” and both terms are used interchangeably by interior designers and product manufacturers. Done correctly, one wallpapered wall transforms a room more effectively than repainting all four. Done incorrectly, it peels, slants, or looks off within months.
How to choose the best wall for your wallpaper accent wall
The ideal accent wall naturally draws the eye upon entering a room, typically the wall behind the bed, sofa, or fireplace. That instinctive pull is your best guide. Stand in the doorway of the room and notice where your gaze lands first. That wall is your candidate.
Beyond instinct, apply these practical filters before committing:
- Fewest obstructions. Walls with multiple outlets, light switches, or windows require more cutting and pattern matching. Each cutout is a potential error point.
- Lighting quality. North-facing walls receive the least natural light and can make wallpaper appear dull, especially darker patterns. South or east-facing walls show colors more accurately throughout the day.
- Wall size vs. pattern scale. Bold large patterns suit walls wider than 3 meters. Small repeating patterns work better on narrower walls to avoid overwhelming the space.
- Room function. In a bedroom, the wall behind the headboard is the standard choice. In a living room, the wall anchoring the sofa or the one framing a fireplace works best.
Once you identify the wall, check that its color palette coordinates with existing room elements: rugs, cushions, and furniture upholstery. A geometric or floral pattern that clashes with your sofa fabric will look unplanned regardless of how well it is installed.
Pro Tip: Take a photo of the room and use a free room visualizer tool to preview how a pattern looks on your chosen wall before purchasing. This step alone prevents the most common buyer’s regret in accent wall projects.
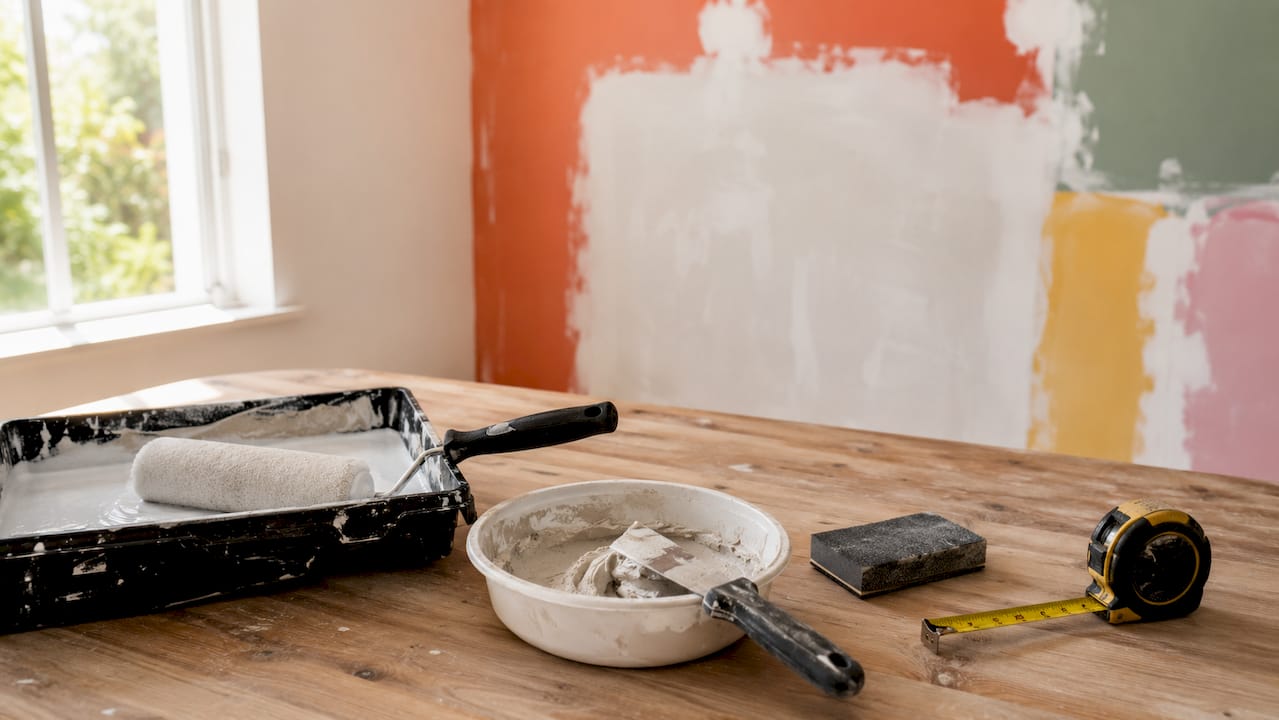
Essential wall prep steps before applying wallpaper
Proper wall preparation is the single factor that separates wallpaper that lasts years from wallpaper that peels within six months. Primer prevents adhesive from soaking into drywall and creates a consistent bonding surface. Skipping it is the most common beginner mistake.
Follow these steps in order:
- Clean the wall. Wipe down the entire surface with a damp cloth to remove dust, grease, and residue. Pay extra attention to areas near light switches and baseboards where grime accumulates.
- Repair imperfections. Fill any holes or cracks with spackle. Once dry, sand smooth with 120-grit sandpaper. Run your hand across the surface. If you feel texture, sand again.
- Apply wallpaper-specific primer. Use a roller to apply an even coat of wallpaper primer across the entire wall. Standard paint primer is not a substitute. Wallpaper primer is formulated to create the right surface tension for adhesive bonding.
- Let it dry completely. Most primers require 2–4 hours of drying time. Do not rush this step. Applying wallpaper over damp primer causes adhesion failure.
The tools you need at this stage: a paint roller, a roller tray, wallpaper primer, spackle, a putty knife, and 120-grit sandpaper. Having all of these ready before you start saves time and prevents mid-project trips to the hardware store.
Pro Tip: Run a flashlight parallel to the wall surface after sanding. The raking light reveals bumps and divots that normal overhead lighting hides. Fix anything you see before priming.
Step-by-step guide to applying wallpaper on an accent wall
Wallpaper installation is a full-day project for beginners. Plan a 9 AM to 4 PM timeline with scheduled breaks. Rushing leads to poor adhesion and visible seams. Treat the timeline as fixed, not flexible.
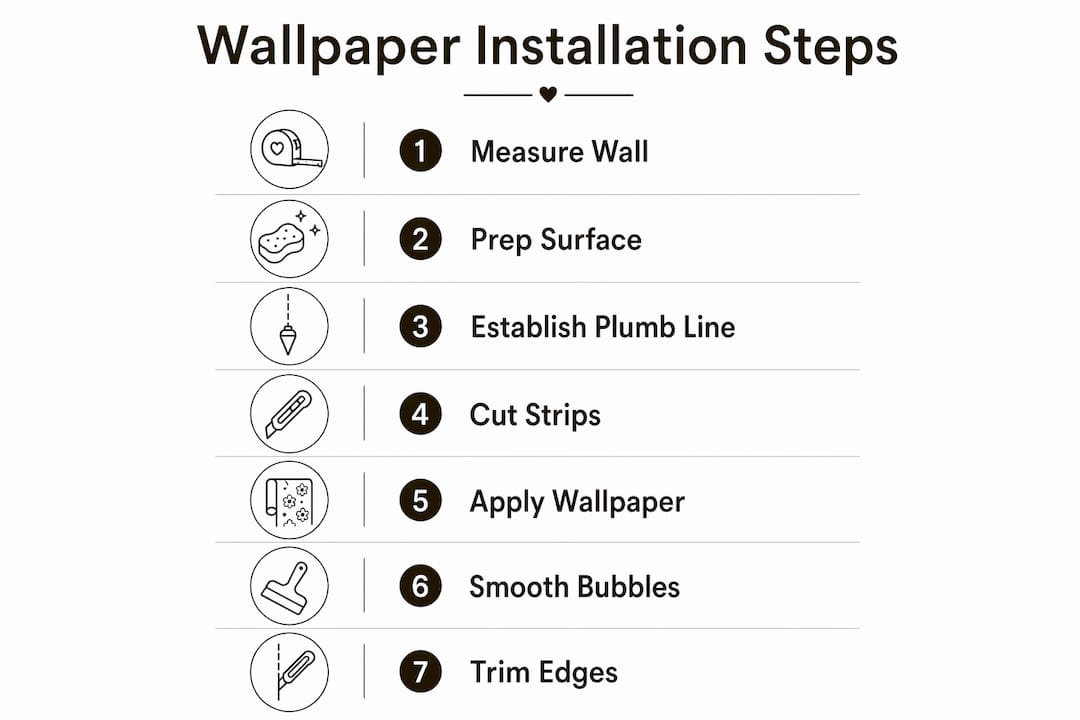
Measure and purchase materials
Measure wall height and width in inches. Multiply them to get square footage, then add 15–20% extra to your total before ordering. Running out mid-installation risks a batch mismatch in color or texture, which is visible even to untrained eyes. Order all rolls from the same production batch.
Establish a plumb line
Use a level to draw a vertical plumb line 1–2 inches away from the corner where you plan to start. Corners are rarely perfectly plumb. Aligning your first strip to a true vertical line prevents pattern slant and gaps that widen as you work across the wall. This step takes five minutes and saves hours of correction.
Cut your strips
Cut strips to wall height plus 4 inches. The extra length gives you trimming room at the ceiling and baseboard. Number each strip on the back in pencil so you know the sequence before you begin hanging.
Apply and smooth each strip
- For peel-and-stick wallpaper, peel the backing in 6–12 inch sections as you press the strip to the wall. Peeling the full backing at once causes the paper to stick to itself or fold incorrectly.
- For paste wallpaper, apply adhesive to the wall or the paper back according to the manufacturer’s instructions, then position the strip.
- Align the first strip to your plumb line. Press from the center outward using a smoothing tool or a clean, dry squeegee to push out air bubbles.
- Overlap each subsequent strip edge by roughly 1/16 inch to prevent visible gaps as the adhesive dries and the paper contracts slightly.
Handle corners and cutouts
Inside corners use strips cut flush to the corner. Outside corners need relief cuts to prevent bulk and bubbling. For outlets and switches, turn off the power, hang the strip over the opening, then cut an X pattern to expose the box and trim neatly.
| Step | Tool needed | Common mistake |
|---|---|---|
| Plumb line | Level, pencil | Trusting the corner as vertical |
| Cutting strips | Straight edge, utility knife | Cutting exact height with no extra |
| Smoothing | Squeegee or smoothing tool | Smoothing edge to edge instead of center out |
| Pattern matching | Tape measure | Ignoring repeat offset between strips |
| Corner handling | Utility knife | Wrapping paper around outside corners without relief cuts |
Pro Tip: Pattern registration against fixed architectural features like windows and door frames matters more than strip-to-strip alignment. Center your dominant pattern motif on the wall’s most visible point, then work outward.
What to do when wallpaper installation goes wrong
Most installation problems are fixable if you catch them early. The key is knowing which issues resolve on their own and which require immediate action.
- Small air bubbles. Small bubbles often disappear within 24–48 hours as the adhesive dries and the paper contracts. Do not touch them during this window. If a bubble remains after 48 hours, use a straight pin to puncture it at an angle, press out the air, and smooth the surface flat.
- Lifting seams. Press the seam flat with a seam roller. If the edge has dried and will not bond, apply a small amount of seam repair adhesive under the edge, press firmly, and wipe away any excess immediately.
- Misaligned patterns. If you notice a pattern shift between strips during installation, carefully lift the most recently applied strip while the adhesive is still wet and reposition. Once adhesive sets, repositioning risks tearing.
- Premature peeling. This almost always traces back to skipped or inadequate primer. If peeling occurs within the first few weeks, the wall surface needs to be re-prepped before reapplication.
“Small pattern misalignments are rarely noticeable from a normal viewing distance. Focus on straight vertical lines and general alignment rather than chasing perfection at every seam.” Source
Pro Tip: Keep a small cup of adhesive and a 1-inch brush on hand throughout installation. Touch up any lifting edges immediately rather than planning to fix them later. Adhesive that has dried once is harder to reactivate.
Key takeaways
The most effective wallpaper accent wall starts with choosing the right wall, priming the surface, and applying strips from a true vertical plumb line outward.
| Point | Details |
|---|---|
| Choose the focal point wall | Stand in the doorway and select the wall your eye naturally finds first. |
| Avoid north-facing walls | Low light makes wallpaper colors appear flat and dull on north-facing surfaces. |
| Always prime before applying | Wallpaper-specific primer prevents peeling and creates a reliable bonding surface. |
| Use a plumb line, not the corner | Corners are rarely vertical; a level-drawn line keeps every strip straight. |
| Buy 15–20% extra material | Extra stock prevents batch mismatches if you run short mid-installation. |
What Wallsneedlove has learned from real accent wall installs
The part most guides skip is the mental side of this project. First-timers often expect the wall to cooperate. It rarely does on the first strip. The plumb line step feels unnecessary until you skip it and watch your pattern drift two inches by the time you reach the far edge of the wall.
Primer is not optional. Wallsneedlove has seen enough installations to say with confidence that every premature peel traces back to a wall that was not properly primed. Homeowners treat primer as an extra step. It is actually the foundation the entire project rests on.
Pattern matching against architectural features like window frames and door casings is what separates a professional-looking result from one that looks slightly off without anyone being able to say why. Center your dominant motif on the most visible part of the wall, then work outward. This one decision changes how the finished wall reads from across the room.
For first-timers: the result is achievable. Commit to the full day, follow the sequence, and resist the urge to rush the drying steps. The walls you are working on will be there for years. The extra hour spent on prep is worth it.
— Wallsneedlove
Find the right wallpaper for your accent wall
Wallsneedlove carries hundreds of patterns designed specifically for feature walls, from scenic mountain murals to hand-drawn geometric patterns and vintage floral prints. Every product is available in peel-and-stick or traditional paste formats, custom printed within 1–3 days, and certified Greenguard Gold for indoor air quality.
Whether you are working with a narrow bedroom wall or a wide living room feature wall, the full wallpaper collection includes options scaled for both. Peel-and-stick formats are particularly well-suited for first-time installers following a step-by-step wallpaper guide, since they allow repositioning during application. Browse by style, room type, or pattern scale to find the right fit for your space.
FAQ
What wall should I choose for a wallpaper accent wall?
Choose the wall your eye naturally finds when you enter the room, typically the wall behind the bed, sofa, or fireplace. Avoid walls with many outlets, windows, or north-facing orientation, as these complicate installation and reduce visual impact.
Do I need primer before applying wallpaper?
Yes. Wallpaper-specific primer prevents adhesive from soaking into drywall and is the primary defense against peeling within the first six months.
How much extra wallpaper should I order?
Order 15–20% more than your wall’s square footage requires. This buffer covers pattern matching offsets, cutting errors, and protects against mid-project shortages that can result in batch color mismatches.
How do I fix air bubbles after installation?
Small bubbles typically resolve within 24–48 hours as the adhesive dries. Larger bubbles that remain after 48 hours should be punctured with a straight pin at an angle, then pressed flat and smoothed.
What is a plumb line and why does it matter?
A plumb line is a true vertical reference drawn on the wall using a level, positioned 1–2 inches from the corner. Since corners are rarely perfectly vertical, aligning your first wallpaper strip to a plumb line prevents pattern slant across the entire wall.


Leave a comment